Signal Key

Source
Icon
Message
• TEST
• RJ11
(Landline phone)

Phone call
• EXT TRIG 
(Mobile phone sensor)

Sensor
• EXT TRIG
(Other accessory)

Visitor


Simply download the app and follow the prompts on the screen.


Alternatively, watch the video or follow the steps below for more detailed instructions and to take advantage of additional features.
Note: The Bridge Transceiver is required to connect your Bellman alerting system to the Assistant app. Contact your provider or purchase one here.
No match yet. We'd rather find you a real answer than have AI confidently improvise one.

Discover how easy it is to get notifications on your Phone.
Bellman offers a variety of solutions to help you keep an eye on your home.

Get emergency notifications from connected smoke and carbon monoxide detectors.

Use doorbell and open/closed sensors to alert you if someone rings your doorbell or enters your home.

Use a baby monitor and a contact mat to know when your baby stirs or is trying to leave the crib.

Get an alert on your Visit receivers when you have an incoming call or message.

Bellman keeps a watchful eye on your home and your loved ones - around the clock.

Learn how to connect a transmitter to your Phone.
After the app installation, your current transmitters will be added automatically the first time they are activated. A dialog will appear to confirm that the device and the associated notification are added.
So, for instance when your Baby monitor is activated for the first time, the following dialog will appear:

1 To add a new transmitter, first unpack it. Then open the app, press + to add a device and select your transmitter in the list.

2 Follow the step-by-step instructions to ensure a safe and secure installation.

3 Tap OK when the dialog appears to add the transmitter.

Use the same method to add a Bellman accessory, like for instance a contact mat or a magnetic switch.


Get an introduction and find out the basics.
Once your transmitters are added to your Assistant app, you will start to receive home notifications on your mobile phone.
So, for instance, when someone rings your doorbell, you will get a notification on your phone that you have a visitor.

In addition, your Bellman receivers will alert you when you get a SMS, call or notification. This means that you don’t have to keep track of your phone all the time.

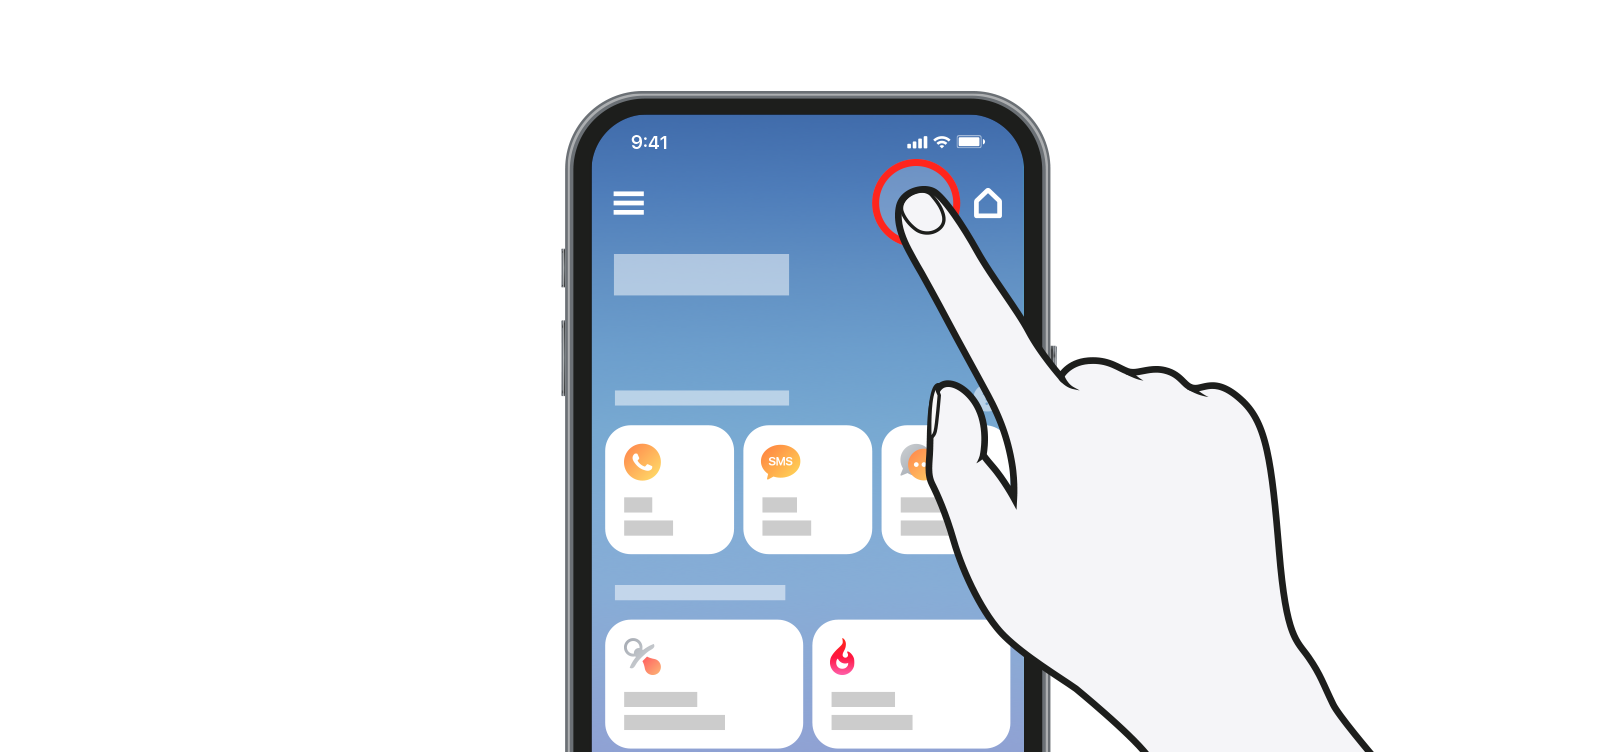
The top row of cards on your home screen controls the notifications generated by your mobile phone.

If the cards are turned ON, calls, SMS, and notifications on your phone will generate an alert on your Bellman receivers.

If you don’t want your Bellman receivers to alert for e.g. incoming calls - just tap the card to turn off the phone notification temporarily.

The bottom cards on your home screen controls the notifications generated by your Bellman transmitters.

If the cards are turned ON, activated transmitters around your home will send a notification to your mobile phone.

If you don’t want your mobile phone to alert for an event in your home - tap the card to turn it off. Please note that the Bellman receivers and other phones will alert as usual.


Learn how to customize your notifications.
Now it's time to take control of your notifications!
The top row on your home screen controls the notifications generated by your mobile phone. Tap the card to turn the notification on or off.
When a phone notification is turned off, the Bellman receivers will not alert but your phone will.

The bottom cards on your home screen control the notifications generated by activated transmitters around your home.
When a home notification is turned off, your mobile phone will not alert but the Bellman receivers will.

To rearrange the order of the notification cards, just drag and drop the card.

To further control your notifications, select My notifications in the menu.

Tap a notification to edit it. Here you can customize the name, room and icon.

Swipe left on a notification to inactivate or delete it. Please note that fire and carbon monoxide notifications cannot be inactivated or deleted for security reasons.


Master how to monitor and edit your Bellman devices.
To edit your devices, start by opening the menu and select My devices in the list.

Tap the Edit button to select the device you want to monitor.

Use the device dashboard to monitor for instance the device’s battery level and Bluetooth connection status.

If your Bellman system features multiple watches, tap the green button to identify your watch and create a private connection.

By activating a private connection, calls and notifications on your mobile phone will only generate alerts on your watch.

If you want to deactivate the private connection, just tap the switch.

Do you want your watch to vibrate for messages and calls on your phone when you are out and about?
1 First, tap the green button to identify your watch and create a private connection. (If the button is greyed out, the connection has already been established.)

2 Then, tap the switch to activate a direct connection.

By establishing a direct phone-to-watch connection, your watch will alert for calls, SMS and notifications outside home too.
Please note that it will not alert for Home notifications such as visitors and smoke.

Tap the switch if you want to turn off the direct connection between your phone and watch.

Start by tapping the Edit button in the list to select the device you want to remove from your mobile phone.

Scroll to the bottom of the screen and tap Remove to disconnect it from your mobile phone. Note that it will remain connected to the Bellman receivers and other phones.

A dialog appears that shows the associated notifications that are removed from the Assistant app as a result. Tap OK to confirm.

To add a new device, tap + on the home screen and select it in the list.

Browse through your latest notifications.
To get an overview of your recent notifications, select History in the menu.

Your notifications are sorted by date and time and you can easily go back to see what you have missed.


Discover how to keep your system up to date.
A pop-up will appear on your home screen when a new software version is available. Tap OK to proceed.

1 Browse the device list to find the first unit you want to update. Tap the green button on the device card to initiate the update.

2 Follow the on-screen instructions during the installation procedure. When the installation is completed, the device will perform a restart. Please be patient, this can take a few minutes.

3 Browse the list to find the next device you want to update and tap the green button on the device card to proceed.
Please make sure to update all units in the list, so you don’t miss out on any new and exciting features.

You can also update your unit from the device dashboard. Just browse to the bottom of the page and tap Update device.
If the link is greyed out, and the red dot is gone, there are no new updates available.


Signal and radio keys let you personalize how your Bellman system works.
Signal key: Choose which notification icon appears in the Bellman Assistant app when a transmitter is activated.
Radio key: Slightly changes the system's radio frequency. This can help prevent interference from nearby electronics and keep multiple Bellman systems operating independently in places such as apartment buildings, dorms, and community living centers.
These adjustments are generally simple, but please contact us if you would like assistance.

Use the Signal key to change which notification appears on your phone for each transmitter. This is especially useful when you have two or more of the same transmitter.
A push button can display the  Visitor notification.
A second push button worn by your partner can display the  Assistance notification.
Select a transmitter tab and follow the instructions to adjust its Signal key.

You can set the Signal key to get the notification you like. If you for example want the notification Visitor, then adjust the Signal key setting to  .
.
The telephone transmitter has 3 different inputs. Configure the notification you would like to receive based on the input. TEST is the main input, the RJ11(Landline phone).

TEST

EXT TRIG

EXT TRIG
RJ11
Lift the front cover to access the signal key, then toggle the switches.
Note: Ignore the radio key switches unless you are also changing the radio keys.
Source
Icon
Message
• TEST
• RJ11
(Landline phone)
Phone call
• EXT TRIG
(Mobile phone sensor)
Sensor
• EXT TRIG
(Other accessory)
Visitor

Source
Icon
Message
• TEST
• RJ11
(Landline phone)
Phone call
• EXT TRIG
(Mobile phone sensor)
Sensor
• EXT TRIG
(Other accessory)

Guest

Source
Icon
Message
• TEST
• RJ11
(Landline phone)
Phone call
• EXT TRIG
(Mobile phone sensor)
Sensor
• EXT TRIG
(Other accessory)
Phone call

Source
Icon
Message
• TEST
• RJ11
(Landline phone)
Phone call
• EXT TRIG
(Mobile phone sensor)
Sensor
• EXT TRIG
(Other accessory)

Baby

Source
Icon
Message
• TEST
• RJ11
(Landline phone)
Phone call
• EXT TRIG
(Mobile phone sensor)
Sensor
• EXT TRIG
(Other accessory)
Baby

Source
Icon
Message
• TEST
• RJ11
(Landline phone)
Sensor
• EXT TRIG
(Mobile phone sensor)
Baby
• EXT TRIG
(Other accessory)
Visitor

Source
Icon
Message
• TEST
• RJ11
(Landline phone)
Baby
• EXT TRIG
(Mobile phone sensor)
Phone call
• EXT TRIG
(Other accessory)
Guest

Source
Icon
Message
• TEST
• RJ11
(Landline phone)
Sensor
• EXT TRIG
(Mobile phone sensor)
Phone call
• EXT TRIG
(Other accessory)
Baby

Source
Icon
Message
• TEST
• RJ11
(Landline phone)
Sensor
• EXT TRIG
(Mobile phone sensor)
Phone call
• EXT TRIG
(Other accessory)
Visitor

Source
Icon
Message
• TEST
• RJ11
(Landline phone)
Sensor
• EXT TRIG
(Mobile phone sensor)
Phone call
• EXT TRIG
(Other accessory)
Guest

Source
Icon
Message
• TEST
• RJ11
(Landline phone)
Sensor
• EXT TRIG
(Mobile phone sensor)
Phone call
• EXT TRIG
(Other accessory)
Sensor

Source
Icon
Message
• TEST
• RJ11
(Landline phone)
Sensor
• EXT TRIG
(Mobile phone sensor)
Phone call
• EXT TRIG
(Other accessory)
Baby

Source
Icon
Message
• TEST
• RJ11
(Landline phone)
Sensor
• EXT TRIG
(Mobile phone sensor)
Phone call
• EXT TRIG
(Other accessory)
Baby

Source
Icon
Message
• TEST
• RJ11
(Landline phone)
Baby
• EXT TRIG
(Mobile phone sensor)
Phone call
• EXT TRIG
(Other accessory)
Visitor

Source
Icon
Message
• TEST
• RJ11
(Landline phone)

CO warning
• EXT TRIG
(Mobile phone sensor)
CO warning
• EXT TRIG
(Other accessory)
CO warning

Source
Icon
Message
• TEST
• RJ11
(Landline phone)

Smoke
• EXT TRIG
(Mobile phone sensor)
Smoke
• EXT TRIG
(Other accessory)
Smoke

You can set the Signal key to get the notification you like. If you for example want the notification  Sensor, then adjust the Signal key setting to
  .
.
The doorbell transmitter has 3 different inputs. Configure the notification you would like to receive based on the input. TEST is the main input, the internal microphone.
TEST
INT MIC
EXT MIC
EXT TRIG
Lift the front cover to access the signal key, then toggle the switches.
The 4th switch marked in red is only used for magnetic detection.
Note: Ignore the radio key switches unless you are also changing the radio keys.

Source
Icon
Message
• TEST
• INT MIC
Visitor
• EXT MIC
(Eg. Intercom)
Guest
• EXT TRIG
(Eg. Wired doorbell)
Visitor

Source
Icon
Message
• TEST
• INT MIC
Guest
• EXT MIC
(Eg. Intercom)
Visitor
• EXT TRIG
(Eg. Wired doorbell)
Guest

Source
Icon
Message
• TEST
• INT MIC
Visitor
• EXT MIC
(Eg. Intercom)
Guest
• EXT TRIG
(Eg. Wired doorbell)
Baby

Source
Icon
Message
• TEST
• INT MIC
Guest
• EXT MIC
(Eg. Intercom)
Visitor
• EXT TRIG
(Eg. Wired doorbell)
Baby

Source
Icon
Message
• TEST
• INT MIC
Visitor
• EXT MIC
(Eg. Intercom)
Guest
• EXT TRIG
(Eg. Wired doorbell)
Sensor

Source
Icon
Message
• TEST
• INT MIC
Baby
• EXT MIC
(Eg. Intercom)
Visitor
• EXT TRIG
(Eg. Wired doorbell)
Baby

Source
Icon
Message
• TEST
• INT MIC
Visitor
• EXT MIC
(Eg. Intercom)
Guest
• EXT TRIG
(Eg. Wired doorbell)
CO

Source
Icon
Message
• TEST
• INT MIC
Visitor
• EXT MIC
(Eg. Intercom)
Guest
• EXT TRIG
(Eg. Wired doorbell)
Smoke

You can set the Signal key to get the notification you like. If you for example want the notification  Guest, then adjust the Signal key setting to
  .
.
The baby monitor transmitter has 2 different inputs. Configure the notification you would like to receive based on the input. TEST is the main input, the internal microphone
TEST
MIC
EXT TRIG
Lift the front cover to access the signal key, then toggle the switches.
Note: Ignore the radio key switches unless you are also changing the radio keys.
Source
Icon
Message
• TEST
• MIC (Sound)
Baby
• EXT TRIG
(Eg. Contact mat)
Visitor
Source
Icon
Message
• TEST
• MIC (Sound)
Baby
• EXT TRIG
(Eg. Contact mat)
Guest
Source
Icon
Message
• TEST
• MIC (Sound)

Baby
• EXT TRIG
(Eg. Contact mat)
Baby
Source
Icon
Message
• TEST
• MIC (Sound)
Baby
• EXT TRIG
(Eg. Contact mat)
Baby

You can set the Signal key to get the notification you like. If you for example want the notification Attention, then adjust the Signal key setting to to  .
.
The push button transmitter has 1 input: the main button. Configure the notification you would like to receive for this input.
Front button
Pull off the front cover with a flat-head screwdriver by pressing in the notches on the edges, then toggle the switches.
Note: Ignore the radio key switches unless you are also changing the radio keys.

Source
Icon
Message
Front button

Invalid

Source
Icon
Message
Front button
Baby

Source
Icon
Message
Front button
Guest

Source
Icon
Message
Front button
Sensor

Source
Icon
Message
Front button
Invalid

Source
Icon
Message
Front button

Attention

Source
Icon
Message
Front button
Phone call

Source
Icon
Message
Front button
Visitor
If your Bellman system activates without an apparent cause, nearby electronics or another Bellman system may be creating radio interference. Changing the radio key slightly changes the operating frequency. Set all units in one Bellman system to the same radio key, especially when multiple systems are used nearby, such as in apartment buildings, dorms, or community living centers. The radio key switches are located under the transmitter cover.

Open the transmitter front cover and move any radio key switch to the Up = On position to change the radio key. (By default, all radio key switches are positioned Down = Off. )

Press and hold the Test/Function button on the receiver until the green and yellow front LEDs blink alternately. Release the button.

Press both Test buttons simultaneously on the transmitter within 30 seconds to send the new radio key.
Note: Some products only have one Test button.

All front LEDs on the receiver blink sequentially to show that the radio key has been changed. It then returns to normal mode.
Note: All Bellman units must be set to the same radio key in order to operate as a group.
Transmitters monitor events around the home, such as a ringing doorbell, a crying baby, an incoming telephone call, or a smoke alarm. When a transmitter is activated, it sends a wireless signal to the connected receivers.
Depending on the receiver, the alert may use:
Sound
Bright flashes
Vibration
A combination of alerts
The Bellman Bridge connects a compatible alerting system to the Assistant app, a Bellman Watch, and other supported mobile devices.
It works in both directions:
alerts can appear on a connected phone, tablet, or Bellman Watch.
Supported calls and messages from a mobile device can activate receivers.
You can use the Bellman Bridge and Assistant app without a receiver. In that setup, a connected phone or tablet displays alerts from your transmitters.
However, using the app without a receiver is not typically recommended. A dedicated receiver provides sound, bright flashes, or vibration without relying on the phone being nearby, charged, connected by Bluetooth, and permitted to display notifications.
For the most complete alerting setup, use the app alongside one or more receivers.
For example, if you temporarily turn off a Home notification on your phone, your receivers and other connected phones will continue to respond as usual.
No. The Bridge communicates with the alerting system by radio and with nearby mobile devices by Bluetooth. Its core alerting functions do not require Wi-Fi, cellular service, or a monthly subscription.
An internet connection may still be needed to download or update the app and to receive notifications from internet-based communication apps.
The Bridge connects to nearby mobile devices using Bluetooth. When you leave home or move outside Bluetooth range, that connection is temporarily lost. It will be restored automatically when you return home and move back within range of the Bridge.
While you are away from the Bridge, you will not receive Home notifications from your transmitters, such as visitor or smoke alerts.
If you experience other connectivity problems, please contact us directly so we can help diagnose the issue.
Yes. Multiple compatible devices can be paired with the same Bridge. This can be helpful when several family members, caregivers, or staff members need alerts from the same alerting system.
Each person can manage notifications on their own mobile device without silencing the receivers or the other connected devices.
Yes. A phone can be paired with multiple Bridges. For example, someone with a primary home and a seasonal residence can pair the Assistant app with the Bridge at each location.
The connection is local Bluetooth rather than remote internet monitoring. The phone receives alerts from a paired Bridge when it is within Bluetooth range of that Bridge.
The Assistant app can display alerts generated by compatible transmitters and connected accessories, including:
Doorbell or visitor alerts
Baby monitor alerts
Smoke and carbon monoxide alerts
Telephone alerts
Push-button or assistance alerts
Contact mat and magnetic switch activity
Available alerts depend on the transmitters and accessories installed in the system.
Phone notifications are intended primarily for calls, SMS or messages, and compatible communication apps. Examples may include:
Phone calls
Messages or SMS
Facebook Messenger
The Bridge is not designed to mirror every notification from every app. Compatibility can vary by mobile device, operating system, app version, and notification permissions.
Yes. The Assistant app separates them into two groups:
Phone notifications control which supported calls and messages from the mobile device activate receivers.
Home notifications control which transmitter events appear on that mobile device.
Turning off a Home notification on one phone does not disable the transmitter or prevent receivers and other connected phones from alerting.
This depends on the mobile device settings.
On supported iPhones, enable Critical Alerts for the Assistant app.
On Android devices, allow the app as an exception to Do Not Disturb and permit its notifications.
Menu names and available settings can vary by phone model and operating-system version.
Yes. The system can be expanded as needs change. Compatible transmitters and accessories can be added through the Assistant app, and existing devices can be removed when they are no longer needed.
Make sure new devices use the correct regional radio frequency and the same radio key as the rest of the system.
In an open area, the Bridge supports:
System radio coverage of up to approximately 150 m (164 yd)
Bluetooth coverage of up to approximately 200 m (219 yd)
Actual range is usually shorter indoors. Walls, floors, building materials, nearby electronics, and the Bluetooth performance of the mobile device can all affect coverage. Position the Bridge centrally in the home and near a power outlet whenever possible.
The Bridge is normally powered through its power adapter and includes two AA backup batteries. If mains power is interrupted, the batteries provide backup power.
The LEDs indicate when the Bridge is running on backup power or when the batteries need attention. Replace them with fresh 1.5 V AA alkaline batteries when required.
The radio key identifies which devices belong together. The Bridge and every transmitter and receiver in one system must use the same radio-key setting.
Changing the radio key can also help when:
Nearby electronics create radio interference.
Two alerting systems are used close together, such as in an apartment building, dormitory, or community living center.
The current Bridge documentation lists support for:
iOS 15 or later
Android 8.0 or later
iPhone 6S or later
Modern Android phones and tablets that meet the app requirements
Bluetooth performance and available notification features can vary by device.
On supported setups, a Bellman Watch can use a direct connection to receive calls, SMS, and compatible phone notifications when it is away from the Bridge.
A private phone-to-watch connection must be created first. This direct connection does not provide Home notifications such as visitor or smoke alerts when the watch is away from the alerting system.
Note: The most frequent connectivity issue is often caused when users close the Assistant app. The Assistant app needs to be running in the background of your phone. As you switch between apps, please ensure you don't flick the app upward and accidentally close the application.

This won't cause any issues with the phones operation or battery life.
Amber LEDs indicate that the backup battery level is low. Try the following:
Change the batteries. Open the transceiver cover and replace the batteries. Use only 1.5 V AA (LR6) batteries.
Connect to power. Confirm that the power cable is connected to the adapter and that the adapter is connected to mains power.
Red LEDs blinking every minute indicate that the backup batteries are almost depleted. Try the following:
Change the batteries. Open the transceiver cover and replace the batteries. Use only 1.5 V AA (LR6) batteries.
Connect to power. Confirm that the power cable is connected to the adapter and that the adapter is connected to mains power.
Press and release both test buttons on the transceiver to send a signal to the receiver.
If the transceiver LED lights up in green:
Check the receiver power. Make sure its batteries are not depleted and that it is connected to mains power, if applicable.
Check the radio key. Make sure all units use the same radio key. See Changing radio key.
Move within wireless range. Move the receiver closer to the transceiver.
If the transceiver LED does not light up in green:
Check the power and batteries. Confirm that the power adapter is connected and the backup batteries are not depleted. If the LED remains off, contact your retailer about warranty and service.
If the receiver responds when you press the test buttons:
Check the accessory connections. Make sure every cable between the transceiver and connected accessories is secure.
Make sure the Assistant app is open or running in the background and that the notification card for the transmitter or connected accessory is active on the app home screen.
Check notification settings on iOS 12 or later:
Open Settings and select Notifications.
Select Bellman Assistant from the app list.
Turn on Critical Alerts.
Note: On older iOS versions, turn off Do Not Disturb so app notifications can be delivered.
Check notification settings on Android 11 or later:
The exact steps vary by device. On a typical Samsung device:
Open Settings, select Notifications, and open Do Not Disturb.
Select Apps, choose Add apps, and select the Assistant app.
Turn on All notifications.
Note: On older Android versions, turn off Do Not Disturb so app notifications can be delivered.
Check communication between the transmitter and Mobile phone transceiver:
Press and release the transmitter test button or buttons. The bottom transceiver LED should light up in green. If it does not, consult the transmitter manual.
Check communication between the Mobile phone transceiver and mobile device:
Press and release both transceiver test buttons. The top LED should light up in green.
If the LED stays off: Replace the depleted batteries.
If the LED lights but no notification appears: Check the Bluetooth status on the app home screen. If the house icon is red, continue with the steps below.
Make sure Bluetooth is turned on.
Turn Bluetooth off and back on.
Force-quit the Assistant app, then reopen it.
Confirm that the Mobile phone transceiver appears as a paired device. If it does not, open Menu > My devices, select Replace on its device card, and follow the pairing instructions.
Make sure the Assistant app is open or running in the background and that the phone-call and message notification cards are active. Then press and release both test buttons on the transceiver.
If the transceiver LED does not light up in green:
Check the power and batteries. Confirm that the power adapter is connected and the backup batteries are not depleted. If the LED remains off, contact your retailer about warranty and service.
If the receiver responds and a notification appears on the mobile device:
Check the mobile device settings. Some settings can prevent calls and messages from being forwarded to the transceiver.
If the receiver responds but no notification appears on the mobile device:
Check Bluetooth. If the house icon on the app home screen is red, turn Bluetooth on, cycle it off and on, and force-quit and reopen the Assistant app.
Check third-party apps. Test calling or messaging apps such as Facebook Messenger, Skype, WhatsApp, WeChat, or Google Hangouts. Compatibility can vary by phone model.
If the receiver does not respond:
Check the receiver power. Make sure its batteries are not depleted and that mains power is connected, if applicable.
Check the radio key. Make sure all units use the same radio key. See Changing radio key.
Move within wireless range. Move the receiver closer to the transceiver.
Check for Bluetooth interference. Temporarily disconnect other Bluetooth devices, such as devices streaming music.
Test third-party communication apps. Compatibility can vary for apps such as WhatsApp, Skype, and Facebook Messenger.
Check the following possible causes:
The SMS was converted to an MMS
On some Android devices, a long or complex SMS may be converted to an MMS. receivers do not support MMS notifications.
RCS messaging is active
RCS messages can look like SMS messages but are delivered differently. To turn off RCS in Google Messages:
Open Google Messages and tap the account icon.
Select Messages settings > RCS chats.
Turn off RCS chats and confirm.
The exact menu names may vary by device.
Another alerting system nearby may be triggering yours. Change the radio key on every unit in your alerting system to prevent radio interference. See Changing radio key.
